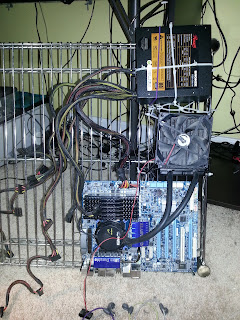
Last night I noticed not just one but TWO of my desktop's fans had stopped moving. This wasn't the first time Sully (the blue monster pictured (yellow is new)) needed some love, and I knew it wouldn't be the last. After about 3 years of occasional but recurring need for repair, I started growing tired of taking it apart and digging through its components to get to any particular problem zone (generally fans needing to be oiled).
At first, I started wondering if I needed a desktop at all. Perhaps I could hook my ultrabook up to all of my monitors and just use that?
Well, that was easy. A couple USB->HDMI adapters lying around & admittedly one splitter. Too easy. Back to Sully.
I was casually brainstorming more efficient ways to build a computer - both for better heat management and to prevent dust build-up. Perhaps I should just install it into an IKEA storage cube?
Lucky for me, my girlfriend is a redditor, so she enlightened me about the possibility of wall-mounting a PC. Wow. Genius! This would mean the heat & exhaust could be positioned right next to the ventilation intake & near the ceiling, preventing my office from inevitably heating itself like a cauldron.
Proper preparation often diminishes both the fun and difficulty of a puzzle, so I typically MacGyver makeshift, ad-hoc solutions.
I started by scrounging some supplies - most importantly, a mounting surface. Sharing a storage room in the basement with a restaurant and coffeeshop has its benefits- as I can often find very useful jetsam.
When I caught a glimpse of a spare metal storage shelf, I knew immediately the search was over - not only would it be strong enough to support a PC's weight, but it would have space for cable management and ventilation - not to mention a faster and more flexible mounting system. Zip ties!
Another stroke of luck - mounting brackets leftover from deconstructing a wardrobe - meant I had everything needed to mount the shelf.
I dug around for supplies to mount the soon-to-be-external components. Zip ties, twist ties, and sticky felt pads seemed sufficient.
I started with the mainboard and fan/heatsink. So far so good.
Next up: PSU and HDDs. Conveniently, my drives already had elastic attachment braces on them.
Last up- attach the wall mount brackets and drop it on!

With no power button hooked up yet, I turned it on with a light tap of a screwdriver, and voila! -->
It's alive :)


No comments:
Post a Comment