Saturday, October 26, 2013

How to Fix & Install the Broken Makerbot Replicator USB Driver in Windows 8.1

http://goo.gl/hCSZNw

Despite all of the media buzz about Microsoft partnering with 3D printing companies (including selling Makerbot printers at their stores) & the announcement of 'built-in' or 'native' 3D printing integration in Windows 8.1, performing the upgrade from 8 to 8.1 actually breaks your machine's 3D printing capabilities!

The USB driver acquires the fated yellow exclamation mark, and you'll find your computer feebled in all attempts to connect to any of the Makerbot printers via USB. Attempts to reinstall MakerWare (or just the driver) produce a very vague error.

Fortunately, I found a simple driver signature enforcement workaround is sufficient to get back to printing!

1. Follow these instructions to restart with driver signature enforcement disabled

2. Press Windows+X (or right click on the Windows/Start button) and choose Device Manager. Scroll to where you see the yellow exclamation under USB devices or Ports (it will probably say Replicator). Right click on the device and choose Update Driver. Select "Browse my computer for driver software", then navigate to C:\Program Files (x86)\MakerBot\drivers and click next. Accept the terrifying red warning and your driver will be installed.

3. Happy printing!

Thursday, May 16, 2013

Isn't it about time you switched to a standing desk?

The idea of switching to a standing desk has plenty of initial appeal, but isn't so easy to realize (it might seem). And the longer you wait, the more the idea changes from a curiosity to a guilt-ridden inevitability thanks to the bombardment of countless health articles about why sitting for prolonged periods of time is bad & why standing is better.

Instead of treating the transition as an obligation, I decided to quench my intrigue without spending any money or too much time, and in such a way as to make it easy to reverse if needed.

I was most worried about getting the height & positioning right, so spent 5-10 minutes perusing the web for advice (links at end of post).

Starting with your typical 5-monitor wall-mounted-desktop home office,

the first step is to position your screens at standing eye-level. Ideally, the middle of your main screen should be directly in front of you (at eye level), and about 14-28" away.

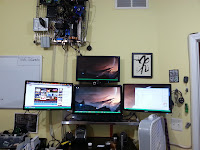
I simply moved my main monitor to the shelf that used to hold the 4th (top) screen, then marked where to drill for the right and left wall-mounts & installed them. I didn't have a 3rd wall-mount, so 3D printed one for the 4th (top) monitor.


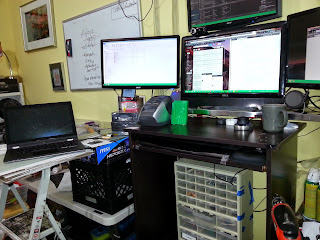
The tricky aspects of switching to a standing desk are 1. finding the best height for the desk/keyboard/mouse and 2. getting used to standing. For the former, I opted for a quick and dirty way to raise the desk to allow for trial and error.


A milkcrate-like bin was good enough for me.


After using the new setup for a bit, I noticed it really wasn't very comfortable for extended sessions. Prolonged static standing is actually too drastic of a transition for the feet, ankles, and back (and I'm a pretty fit 25-year-old)! Just because you can walk for 5 hours comfortably does not mean you can stand in one place for 5 hours without issue.

I tried using a bar stool, but it didn't provide much alleviation. Thus, I jerry-rigged a temporary standing-desk-chair using zip ties, the feet of an abandoned swivel desk chair from the basement, and some pvc pipe.
I had read that the keyboard should be at or below elbow-level, but definitely not above. I found that every inch makes a big difference, and after precariously propping up the desk further with additional spare wooden slabs, I installed a base platform using old IKEA parts & plastic bins.


All finally felt right, and I was even beginning to no longer need the ghetto office chair supplementation, so I installed some more permanent 'legs' in lieue of the plastic bins.
It's been about a week or so now, and I'm at the point where I'm totally acclimated to the standing desk- I would recommend you wear shoes though, to avoid hurt feet/achilles. Definitely enjoying it, too.

I needed another work space yesterday and noticed the new desk height makes it really easy to add desk real estate.... TBC


Some related external links/resources:
http://en.wikipedia.org/wiki/Standing_desk
https://myupdesk.com/updesk/maple-large
http://iamnotaprogrammer.com/Ikea-Standing-desk-for-22-dollars.html
http://www.opensoul.org/blog/archives/2012/01/09/the-40-standup-desk/
http://pinterest.com/makeuseof/behind-the-scenes/

Tuesday, May 7, 2013

I can't believe the Lenovo Yoga is still the best machine! How to fix the intermittent keyboard and mouse randomly stopping working bug

(for why the Yoga is the best, see my original post, here). Also be sure to pick up a stand dock to use/dock the yoga in portrait orientation!

The keyboard and mouse sometimes stop working on my Lenovo Yoga due to a bug with the ymc service + related device orientation sensor. The purpose of the service is to automatically disable the keyboard + mouse while the device is being used as a tablet so pressing keys/touchpad doesn't interfere with whatever you're doing.

However, for some reason these relatively important input devices seem to enjoy disabling themselves randomly during normal use.

Here's a 'hotfix':


1. create 2 files, ymcstop.bat & ymcstart.bat

2. open with text editor and type 'net stop ymc' and 'net start ymc', respectively (without quotes), then save
3. place a shortcut in C:\Users\Will\AppData\Roaming\Microsoft\Windows\Start Menu\Programs to each file (replace Will with your username)
4. right click and change the icon to something you like
5. press start and type 'ymc' - now right click on each (start and stop) and 'Pin to Start'

If the keyboard/mouse ever stop working, simply press the windows icon (or slide from the right) to get to the start screen and press the ymcstop you created. If you want to re-enable the service (which disables the keyboard for tablet use), simply do the same but click the ymcstart you created.

Hope this helps!

Friday, April 26, 2013

Predatorothology

I'm in episode 3 of Hemlock Grove and got curious about the term 'predatorothology'. Then Google told me there were literally 0 search results. That's ridiculous. Makes no sense whatsoever.

The werewolf transformation in episode 2 was the most visually striking & goriest one I've ever seen - and the show has thus far kept my attention piqued independently of that scene - so I'll continue to give it a go.

However, for all you Netflix subscribers out there, I'd highly recommend checking out these shows first (if you haven't already):

http://mobtechwatch.blogspot.com/2012/09/how-to-watch-any-tv-show-for-free.html

Friday, February 15, 2013

How to Wall-Mount Your Desktop for $0 and < 2 Hours

Last night I noticed not just one but TWO of my desktop's fans had stopped moving. This wasn't the first time Sully (the blue monster pictured (yellow is new)) needed some love, and I knew it wouldn't be the last. After about 3 years of occasional but recurring need for repair, I started growing tired of taking it apart and digging through its components to get to any particular problem zone (generally fans needing to be oiled).
At first, I started wondering if I needed a desktop at all. Perhaps I could hook my ultrabook up to all of my monitors and just use that?
Well, that was easy. A couple USB->HDMI adapters lying around & admittedly one splitter. Too easy. Back to Sully.

I was casually brainstorming more efficient ways to build a computer - both for better heat management and to prevent dust build-up. Perhaps I should just install it into an IKEA storage cube? 
Lucky for me, my girlfriend is a redditor, so she enlightened me about the possibility of wall-mounting a PC. Wow. Genius! This would mean the heat & exhaust could be positioned right next to the ventilation intake & near the ceiling, preventing my office from inevitably heating itself like a cauldron.

Proper preparation often diminishes both the fun and difficulty of a puzzle, so I typically MacGyver makeshift, ad-hoc solutions. 

I started by scrounging some supplies - most importantly, a mounting surface. Sharing a storage room in the basement with a restaurant and coffeeshop has its benefits- as I can often find very useful jetsam. 

 When I caught a glimpse of a spare metal storage shelf, I knew immediately the search was over - not only would it be strong enough to support a PC's weight, but it would have space for cable management and ventilation - not to mention a faster and more flexible mounting system. Zip ties!
 Another stroke of luck - mounting brackets leftover from deconstructing a wardrobe - meant I had everything needed to mount the shelf.

I dug around for supplies to mount the soon-to-be-external components. Zip ties, twist ties, and sticky felt pads seemed sufficient.

 I started with the mainboard and fan/heatsink. So far so good.
Next up: PSU and HDDs. Conveniently, my drives already had elastic attachment braces on them.

Last up- attach the wall mount brackets and drop it on!

 With no power button hooked up yet, I turned it on with a light tap of a screwdriver, and voila! -->


It's alive :)

Thursday, February 7, 2013

How to Make Pebble Watch Control Spotify on Android Using Bluetooth!

I just got my Pebble watch today - which is awesome. I've been wanting an e-ink bluetooth bridge to my phone for a while now and when I found the Kickstarter I immediately jumped on it.

 Kira is intrigued by it.


The watch is thin and light enough to accommodate my Eric-Foreman-wrists, and its packaging, interface, and app are all quite well done. I may turn the Pebble it into a dogtag via some 3d printed techneesh parts (due to seemingly impending carpal tunnel syndrome), but for now I'll try it out as intended.

Unfortunately one of the only default apps (music player) doesn't work to control Spotify! After trying about 10 different hacks/apps/mods, I found a working solution!
See video:
I used Media Button Router - so kudos to Harleen Sahni!

Tuesday, February 5, 2013

Build a bossy 3D Printer Cave #ikeahacks

It started with a desire to reduce the noise and insulate the heat generated by my Replicator, but as techneesh grew, I found the need to have an additional printer...

Now I'm up to 3, and need to be able to print in lots of colors (depending on the application and customer demand). Here's what I've pieced together using some Ikea furniture, PVC piping, and some 3D-printed spool holders I found on Thingiverse.