Tuesday, July 24, 2012

LED Juggling Balls!

I learned to juggle for some reason when I was 13 and have (for some other weird reason reason) always thought it would be kind of cool to learn to do it with swords (or liquor bottles as a bartender for fun some night?).

While at Allgood over the weekend I thought it would be fun to brush up and try to improve a bit. I stopped by the vendor that was selling all the glow items. I had been wanting some for a while because I thought they'd be fun, could be used for other purposes (catch, poi), and would be small enough to carry around easily. So, I inquired about some light-up juggling balls. I was utterly shocked: THEY DIDN'T SELL ANY!


So, I made some. You can use any standard LED finger light bought on Amazon (or wherever) for about 50 cents a pop- and the light will last 60+ hours of continuous use.


Here are photos:
With the lights on:

 With the lights off:


Here's a video of me dropping them:


There's another video on my Youtube.


You can buy yours right here, and they will ship Priority (2-3 day).

Color Scheme
First LED
Second LED
Third LED

Thursday, July 12, 2012

How to upgrade the SSD in your Samsung Series 9 NP900X4C or NP900X3B/C Ultrabook

-----UPDATE------
If you'd like to see some photos of ultrabook internals (including what the mSata form factor looks like), see some of my other posts:
http://uselesspuzzles.blogspot.com/2012/11/how-to-fix-lenovo-yoga-fan-noise.html
http://uselesspuzzles.blogspot.com/2012/03/13-ultrabook-with-8gb-ram.html
http://mobtechwatch.blogspot.com/2013/06/sony-vaio-pro-one-of-first-haswell.html
---------------------

I've had some folks ask me how to go about upgrading their storage capacity in their ultrabook.

The simplest answer is to buy a Dockbox, so you don't have to install anything to your machine or follow this guide (which is not necessarily for beginners :)

However, if you have some time, know-how, and $$, upgrading the SSD is definitely the best way to get more storage (at the fastest speed).

Here are the steps for doing it on the Samsung Series 9 (it will be pretty much the same for any ultrabook that uses the mSata form factor SSD. The Asus Zenbook Prime uses the Apple-style form factor).

1. Acquire the tools/supplies:
  • Download the clonezilla iso from here
  • get a 2+gB flash drive
  • follow this guide to make a bootable USB flash drive with the clonezilla file you downloaded
  • get an external drive or enclosure for your new SSD
  • get a new ssd
2. backup your existing drive
  • we need to boot to clonezilla. to do this, shut down your computer, and go to BIOS by turning it on and tapping f2 (or 'del' key in some cases) until you see a (likely) blue screen.
  • in BIOS, you will likely need to navigate to where you see 'boot options' or 'boot order' to enable USB boot and move it to the first in the list. The Samsung also requires you to DISABLE 'fast boot' (on another page) and I had to disable the SSD from the boot order list entirely by highlighting it and pressing shift+1 (shift key and the number 1)
  • now you can restart with the clonezilla USB stick in the machine, and it will boot to XBoot, where you can then select utilities->clonezilla. if you can't get to the XBoot screen, try using a different USB port or ensuring you have all the USB booting options enabled in BIOS. Also, make sure you created the USB stick properly ;)
  • clonezilla is pretty simple to use. after it loads, plug in your external drive and you will see some weird text when it 'sees' the drive. press enter and follow the on-screen instructions to make a backup image of your ssd to the external. you can choose beginner mode, and note you use the spacebar to select which drive is which (your external will be where you store the image, and the 'source drive' will be the 120gB Sandisk/Samsung SSD)
  • You can save yourself a few steps if instead of using an external drive you put your new SSD in an enclosure (effectively making it an external drive) and choosing the device->device option in clonezilla instead of device->image
3. install the new SSD & restore the image!
  • After clonezilla creates the image and saves it on your external, shut down the machine, unscrew the bottom panel and look at my photos for removing the insulation tape to get to the SSD. pop that sucker out and slap in your brand new one
  • Assemble, put the USB stick back in if you removed it, and this time do 'restore from image', obviously selecting the image file from your external as the source and the new SSD as the target
  • Undo whatever you changed in BIOS, remove the flash drive, and boot right back to where you left off, but with your new SSD!
If you have any questions, I'd be happy to answer them below!

-----UPDATE-----
Here are some photos for your reference:


---------------------

Tuesday, July 3, 2012

How to Make a Collapsible LED Light-up Bo Staff for under $30

*****UPDATE: 3/5/2013******
I've dramatically improved the strength and sleekness of the design, and I also made the staff compatible with the $1 finger LEDs from Amazon.
See a new video here.

And you can now buy yours (DIY kit or full staff) directly on my site, techneesh!
**************************

I had about 15 people come up to me over the weekend (at Electric Forest // Rothbury) and ask me where I got my LED staff and how much I paid for it. It seems I'm not the only one frustrated that there's only really one LED staff on the market and it costs about $180!

So, here are instructions to make your own collapsible LED bo staff for about $25!

Building requires about 15 minutes time, a trip to Home Depot, and the custom translucent pieces I made (you can buy them with the button below and you will get them in 2-3 days).

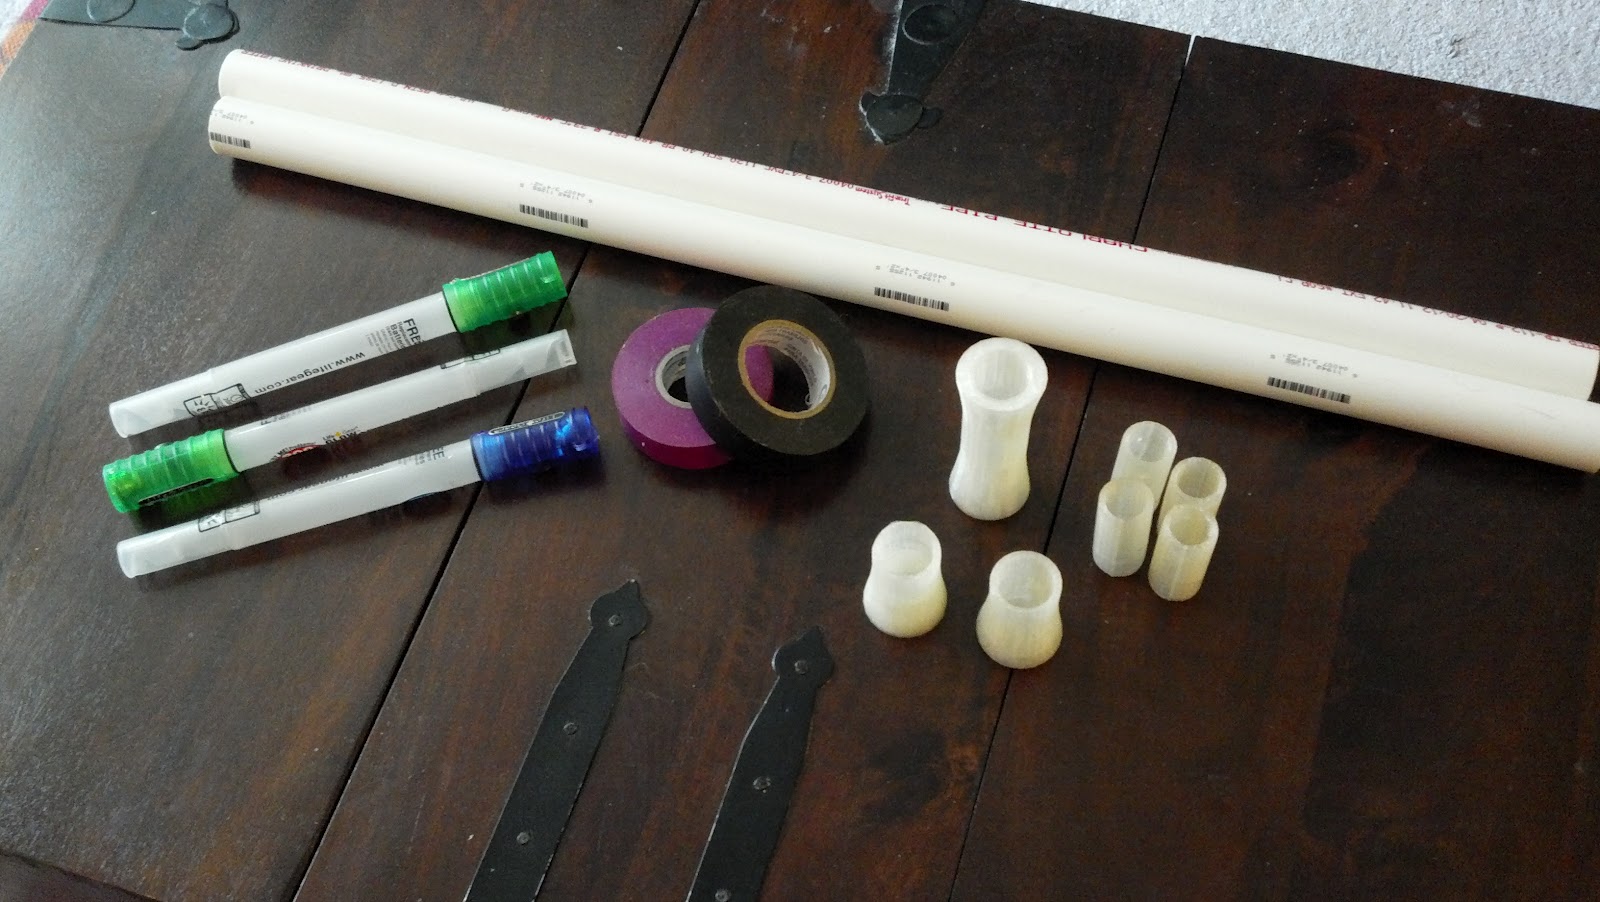
1. Gather the following supplies:


(from top to bottom, left to right)
  • 2x 2' long 3/4" thick PVC pipe (pre-cut at Home Depot) - $1.39 ea/
  • 3x Glow Wands (can find at Sears, Home Depot, Amazon, etc) - $2-5 ea/
  • Electrical tape (whatever colors you prefer) - $3 ea/
  • Translucent endcaps, middle, & connectors - $19 - I made these myself, click the button below to buy them and I will ship out USPS priority (so you will get them in 2-3 days :)
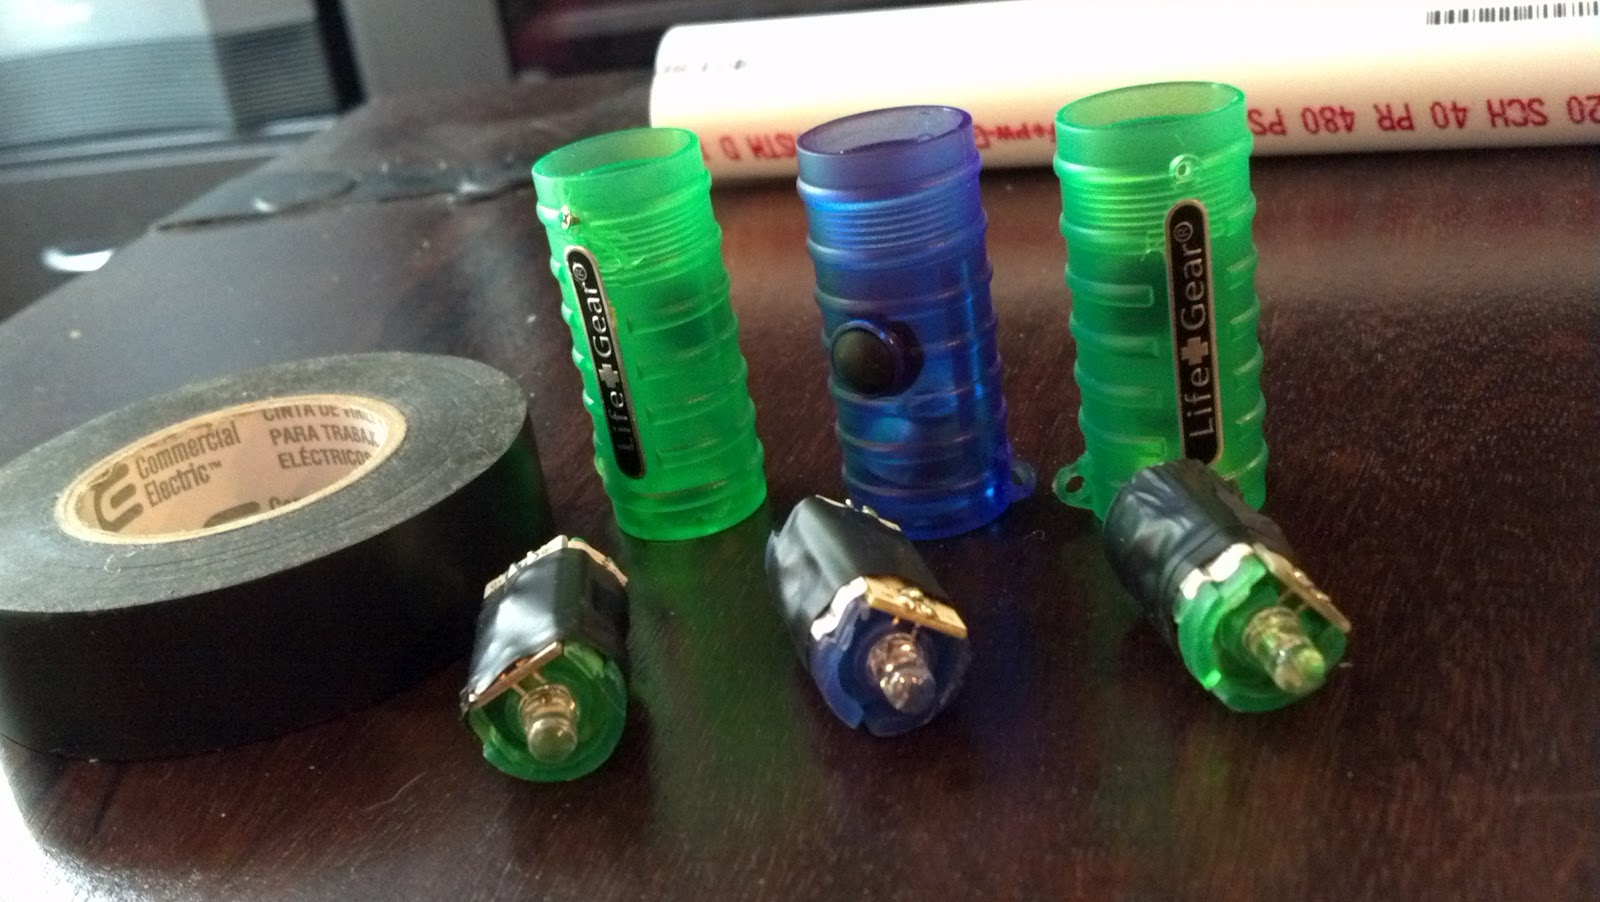
2. Remove the LED + battery assembly from the glow wands, and secure the batteries in place with electrical tape:

3. Place the LED inside my translucent connector pieces and assemble them like this:

4. Wrap the PVC in whatever tape you'd like, or paint it whatever color(s) you wish:

5. Now pop in the endcaps and connect the two PVC pieces with the middle piece!


6. Congratulations! You now have a lightweight, collapsible, awesome-looking LED staff you made yourself for under $30 :)

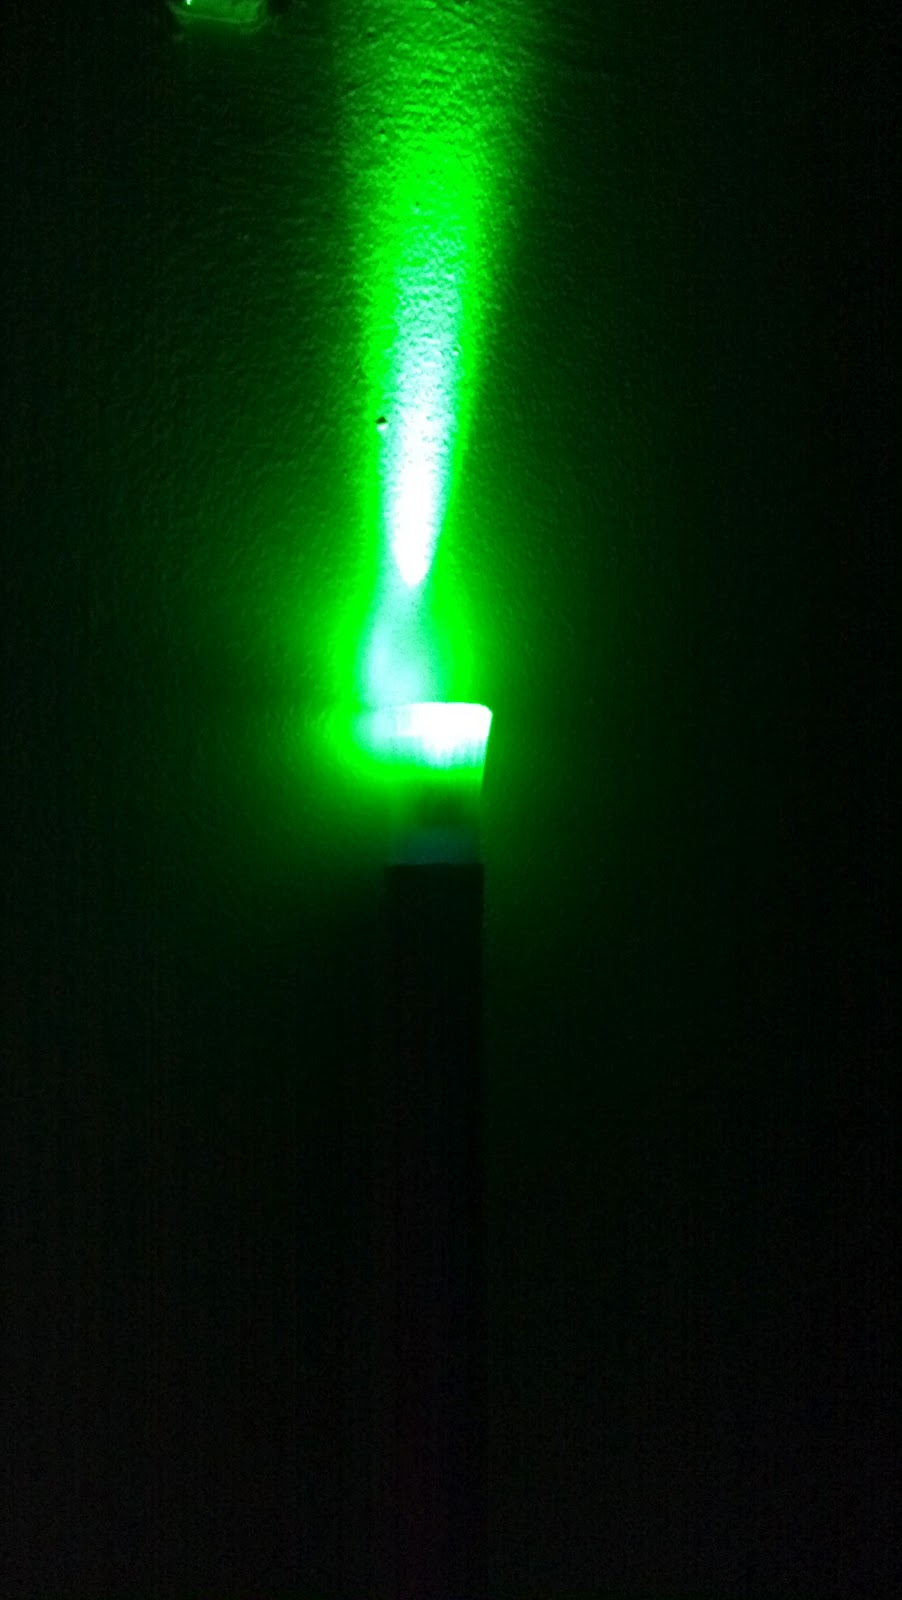
Here's what it looks like in the dark:


For extra stability, you can use some extra electrical tape to secure the middle piece to the PVC. Most glow wand LED lights will last 60+ hours with continuous (and bright!) lighting :)

Please let me know what you think in the comments!

If you'd like me to make the entire staff for you, fill out this form and I'll ship it out within 48 hours!

Color Scheme
Base Color
Middle LED Color
Endcap LED Color (for both tips)